DIY LiFePO4 Battery Kit: The Ultimate Guide to Building Your Home Energy Storage
The transition to solar energy is no longer just about panels; it’s about storage. For many homeowners and off-grid enthusiasts, the DIY LiFePO4 battery kit has emerged as the most cost-effective and rewarding way to achieve energy independence. By assembling your own 48V/51.2V system, you gain deep insight into your power infrastructure while saving significantly compared to pre-built proprietary solutions.
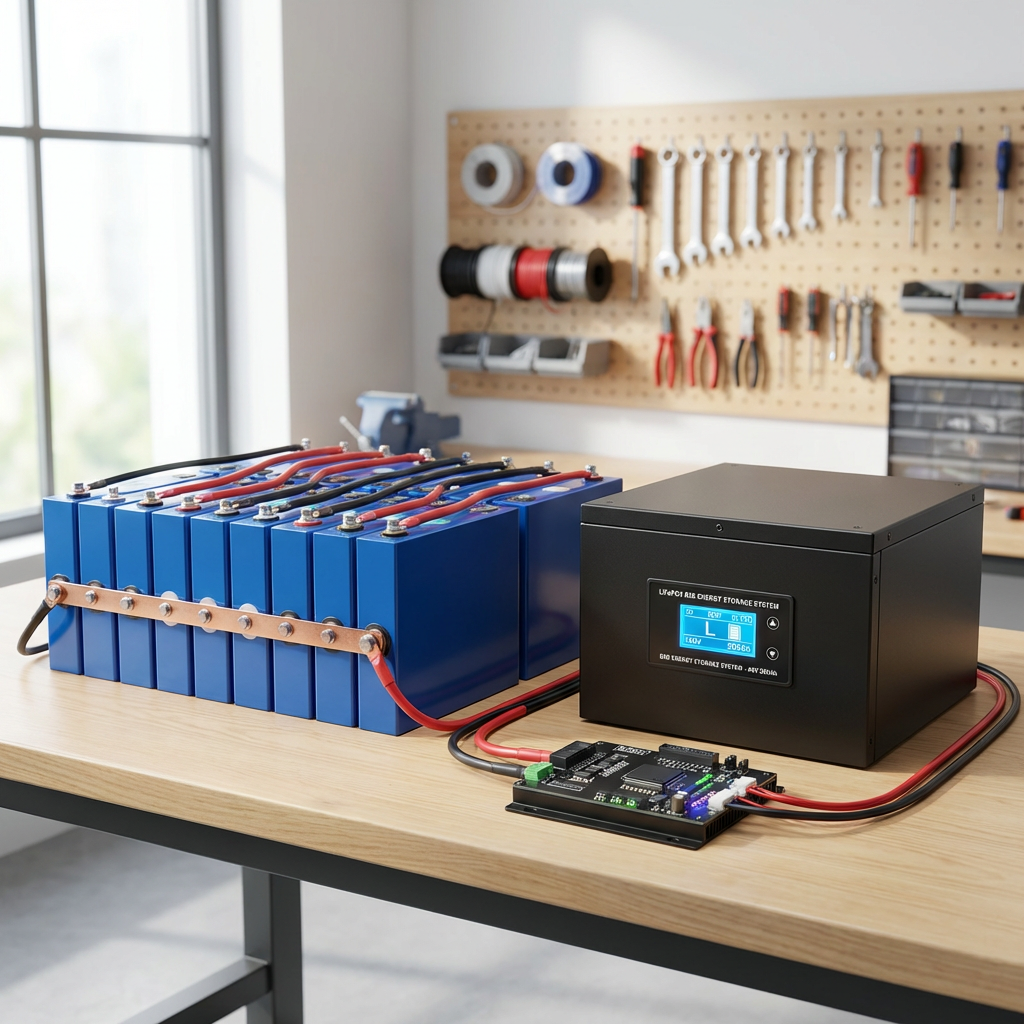
This guide outlines the essential components and safety protocols for building a professional-grade home energy storage system.
1. The Anatomy of a High-Performance Kit
A professional DIY kit, such as the INSUM 280L-JK series, consists of four pillars:
- LFP Cells: The heart of the system. Most residential setups use sixteen 280Ah or 314Ah prismatic cells in a 16S configuration to achieve a nominal 51.2V.
- Battery Management System (BMS): The brain that protects and balances the cells. Integration with a high-current Jikong (JK) BMS is recommended for its superior active balancing capabilities and Bluetooth monitoring.
- Metal Enclosure: A robust, deep-grey or black metal box provides physical protection, structural integrity, and often includes built-in terminals and circuit breakers.
- Busbars and Fasteners: High-conductivity copper busbars connect the cells, ensuring minimal voltage drop across the pack.
2. Safety and Precision: The DIY Mandate
Building a 15kWh+ battery requires respect for high-current electricity. Safety is not an option; it is the foundation.
- Insulated Tools: Always use torque wrenches and sockets with proper insulation to prevent accidental shorts between cell terminals.
- Torque Specifications: Over-tightening can damage cell terminals, while under-tightening causes high resistance and heat. Most M6 terminals require 4–6 Nm of torque.
- Cell Compression: Modern LFP cells benefit from slight compression within the metal box to prevent swelling during heavy cycling, which significantly extends their lifespan.
3. The Assembly Workflow
The process begins with “top balancing”—charging all cells in parallel to exactly 3.65V before series assembly. This ensures all cells start at the same state of charge. Once balanced, the cells are placed into the enclosure with insulating sheets between them. The BMS is then wired according to the 16S diagram, with the main power leads connected to the integrated circuit breaker.
4. Scalability and Expansion
One of the greatest advantages of the DIY approach is modularity. As your energy needs grow, you can easily add parallel battery racks. A standard 16S 280Ah build provides 14.3kWh; adding a second unit doubles your capacity to nearly 29kWh. Advanced BMS units and inverters allow these racks to communicate seamlessly, creating a unified home power plant.
Conclusion: Empowerment Through DIY
Assembling a DIY LiFePO4 battery kit is more than a cost-saving measure—it’s an investment in technical knowledge and energy security. At Insum Energy, we provide the Grade A cells, professional enclosures, and technical support needed to transition from a consumer to a producer.
Ready to power your home on your own terms? Explore our comprehensive DIY kits and start your journey toward energy autonomy today.
Visit insumenergy.com for professional DIY battery kits, cells, and technical support.